Fret leveling
If there are always two direct "neighbors" of a fret in between with their fret crowns in the same plane, and this applies throughout the entire fingerboard, all that remains is to adjust the relief with the truss rod in order to achieve optimal freedom of string vibrations.
Neck Relief Gauge
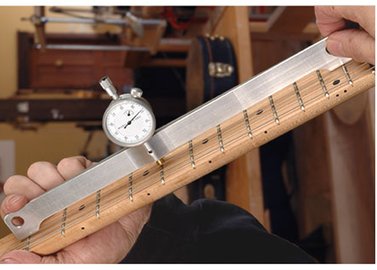
A gauge I wouldn't like to miss anymore. Supplier StewMac rightly praises him in the description:
Adjust a truss rod without guesswork!
Our Neck Relief Gauge helps you quickly and precisely adjust guitar fretboard straightness (for comfortable playability without fret buzz).
It accurately measures the amount of variation from a dead flat position, to take the guesswork out of adding or subtracting neck relief as you adjust the truss rod.
Playability you can measure.
You'll see the relief measurement on the dial as you adjust the truss rod, so it's easy to keep the neck playing its best. It's a great way to establish optimum standards for individual instruments, string gauges and playing styles.
Dependable and accurate.
Designed by Don MacRostie here in our R&D shop, the Neck Relief Gauge is made of machined aluminum for stability. It has an easy to read dial indicator that's super accurate to .001". The feet of the gauge rest directly on the frets, so the measurement won't be compromised by a worn fingerboard. It's 12" (304.8mm) long, and can be positioned to take a relief measurement at either the 5th or 6th fret on a guitar fingerboard.
Strings above the fingerboard
In order for an (electric) guitar to be playable with a pleasant ease, the crowns of the frets under the individual strings must follow a curve that is slightly curved from the straight line. The truss rod is used relatively roughly for this purpose. But without proper dressing, reshaping and polishing of the fret crowns, it is never perfect.
Here, in the Navigator, it is only about the "diagnosis", the precise measurement of the individual distances from the string to the fret. That would be 132 measuring points with 6 strings and 22 frets. With the PLEK method, for example, it is carried out with the automatic control before the deviations from the ideal course are ground away.
For amateurs who want to measure these relationships on the same principle, but with simple means, in order to be able to dress them precisely, a dial gauge, two precise guide rails with two adjustable brackets and a spreadsheet with diagram creation (Excel) as software are sufficient.
PLEK Station for workshop operation (brief description)
“The PLEK station represents the ultra-precise, high-speed technology from plek in a small format. Their small dimensions also allow them to be used in small guitar workshops and repair shops. It is a tool that not only dresses frets precisely, mills saddle notches and saddle inlays and carries out engraving work, but can also be used for quality control and research / development. ”So it says on the website
https://plek.com/products/the-plek-station/
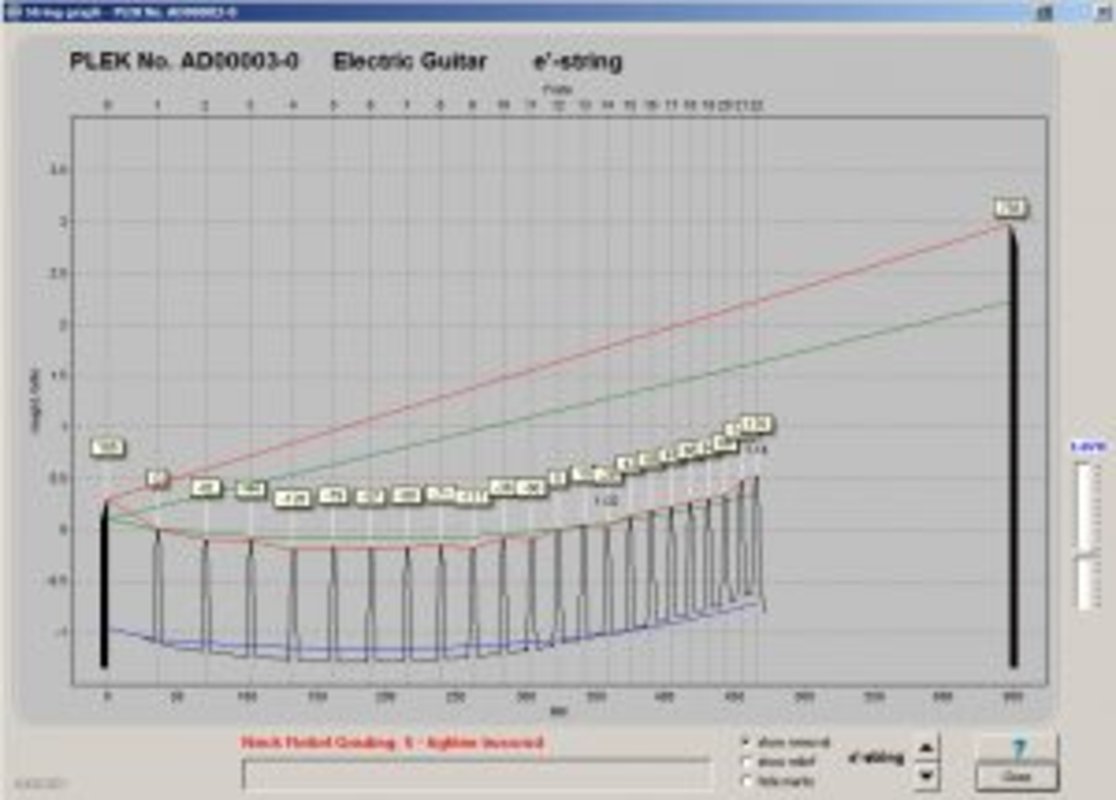
“The first fundamental step in the PLEK process is the initial scan. The instrument - with tuned strings (or with the Plek-Pro with simulated string tension) - is tied in the machine. The fingerboard is then scanned by the sensor module in order to generate deviations for the diagram display.
This scan contains detailed information about the nut, the height of the strings, the fingerboard and the frets. The measured data is then displayed in extremely accurate graphics.
On the scan chart, some fret crowns are well above the optimal height and are likely to buzz if not properly ground. Such diagrams are created automatically for each of the 6 strings.”
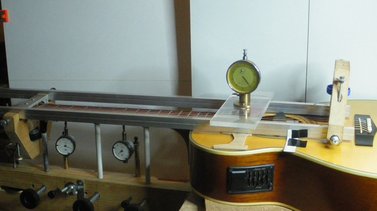
DIY - The Dial Gauge Method
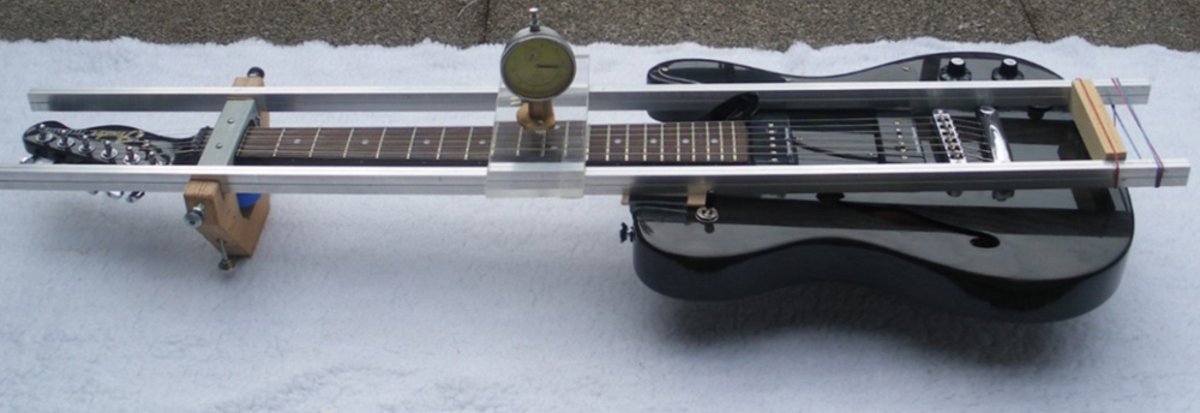
The principle of this method is to compare the relative deviations of the fret crown lines from the ideal straight plane of the two guide rails. Why is the plane between the outer strings not suitable for this? If it were about an optical measuring method, it would also be suitable, but with the mechanical method this plane would be bent by the weight of the dial gauge device and would no longer be straight.
The two perfectly straight aluminum profiles 20 x 11.5 mm are on the left in an adjustable holder (clamped in the first section) and fixed on the body (with double-sided adhesive tape).With two adjusting screws in the bracket, the rails are adjusted as parallel as possible to the fingerboard. The distance between the dial gauge is chosen so that the deepest measuring point does not fall below zero.
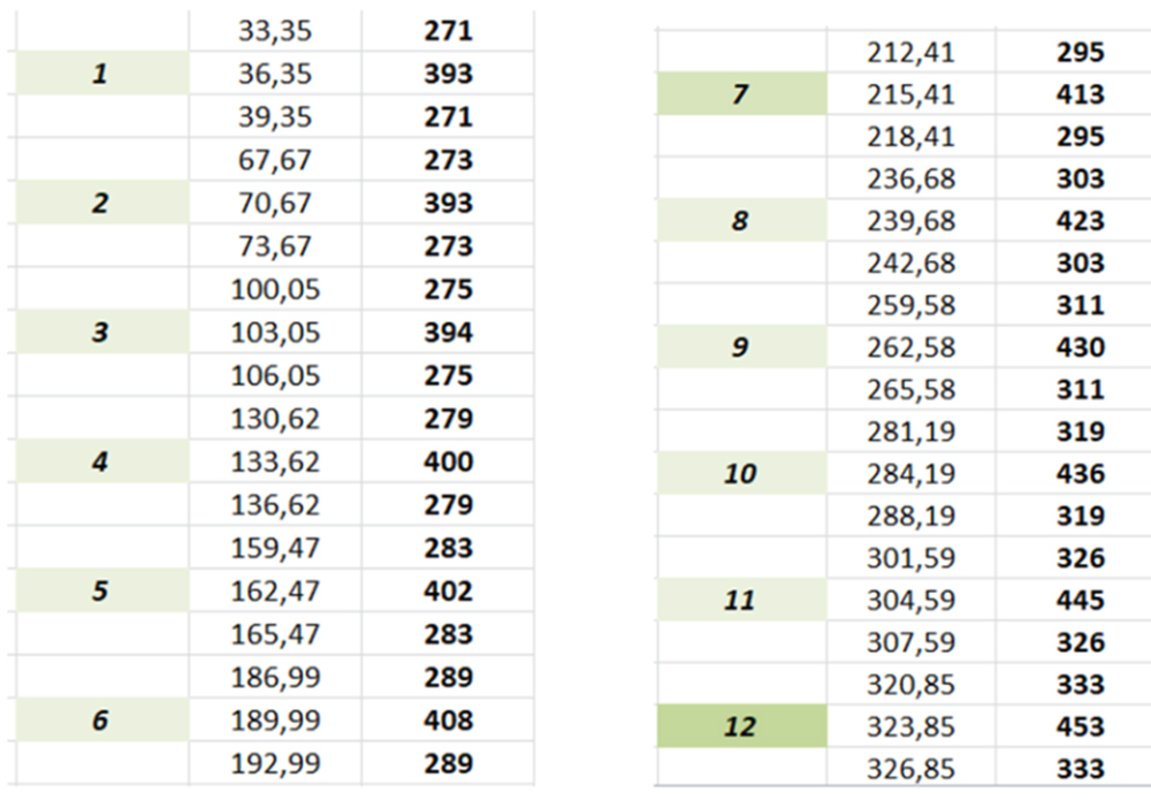
Measurements are made according to the need for thoroughness in three distances, e.g. between the strings e-b, g -d and A-E, or only in a section in the middle between g-d. In order to record both the fret tangent and the fingerboard surface underneath, three positions are measured for each fret and entered in an Excel table. Directly in front of the fret, then the fret crown and then directly behind the fret.
The nut notches and their depth are not included. A narrow blade would have to be used instead of the flat stylus of the dial gauge. A special setting tool from Stewmac with a dial indicator is a good alternative (nut slotting gauge). www.stewmac.com
Tangent of fret crowns before and after dressing

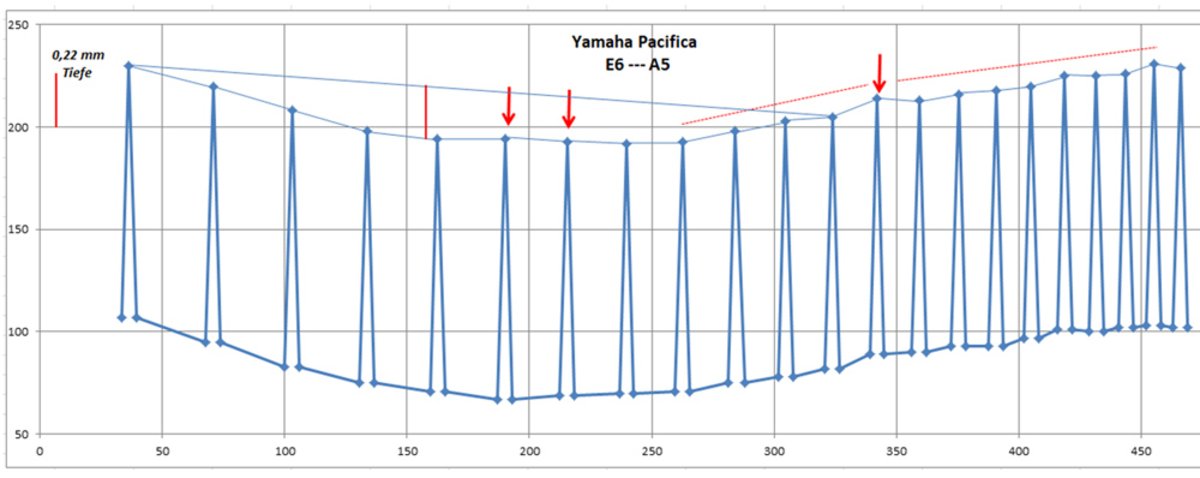
Certainly, doubts will arise as to why start with something so complicated and unusual. An experienced luthier takes the guitar in his hand, rummages through the strings, pressed in various positions, and immediately hears and sees where the problem is. He adjusts the plane of the fingerboard with trussrod, regrinds and polishes the frets, tunes, sweeps the strings and and it's done.
An amateur, a beginner must first gain this experience. Learning by mistakes is an expensive affair here. In order to grind the sleepers into a plane, with as little removal of their height as possible, he must know where the biggest deviations are. Stencils, rulers, Fret Rocker and similar aids are unreliable for this.
Measurement and Diagram take less than an hour, but add a sense of security when grinding. And the investment in the material and construction of the measuring system is definitely worthwhile. Guitars with buzzing strings are often at home and in the surroundings, and the frets wear out again and again when played.
Comments (0)
No comments found!