Design of an original electric guitar with the help of coordinates
Designing your own original electric guitar is a broad concept. Starting with a vague idea, through the first sketches, the selection of hardware, wood or other materials to painting and decoration.
Here in the Navigator we focus on the initial phase of the design, which is about the proportions of shapes, contours, the accuracy of the placement of parts and especially the dimensions, positions and coordinates of characteristic points.
Most people perceive the appearance of the guitar, especially the electric one, primarily as an artistic object, the exact dimensions of which they do not immediately use for assessment. Even the physical laws of acoustics behind the sound quality of an electric guitar don't necessarily interest a normal consumer.
We can easily determine the weight of a guitar by weighing it, but measuring its shape, size, and hardware locations is a little more involved. This requires a relatively large number of measured values, which requires a uniform system for assigning characteristic parameters.
An experienced luthier is well aware that the length of the six strings must match the distances between the frets on the fingerboard exactly to a tenth of a millimeter. And that the transverse profile of the fingerboard has its own special radius and the longitudinal profile requires a certain bend, which is known as a relief. An inexperienced or impatient novice should pick these things up on time.
The first steps
If you are standing in front of an empty sheet of drawing paper and don't really know where to mark the first lines and contours of your future self-made guitar, then you have landed here in time.
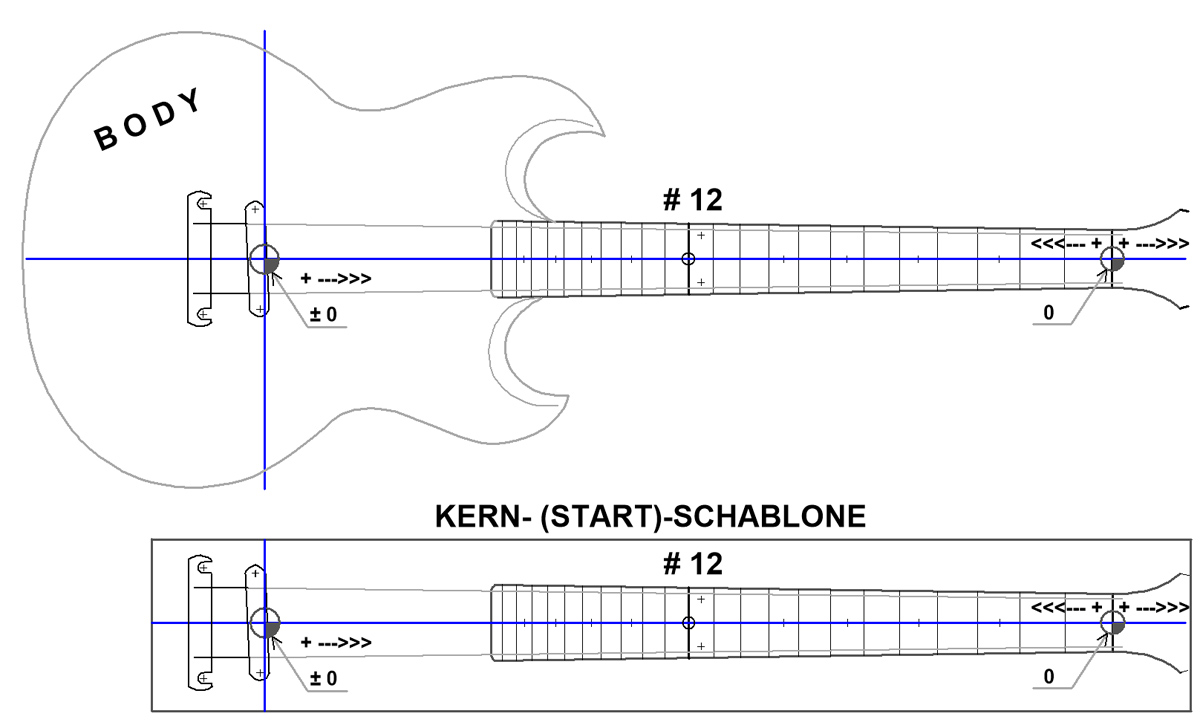
Even if you can already use a vector drawing program, the position of the zero point and the center line, as given in the template, is also very helpful in the screen grid. And then entering the checkpoint coordinates is definitely the easiest exercise.
If something looks perfectly symmetrical, you will almost always find a deviation on closer inspection. Certainly a lot with modern electric guitars and basses. Nevertheless, it makes sense to always draw an elongated axis of symmetry (center line) in plan view as the most important line first.
In the second step, the scale length must take its position on the center line, in such a way that it does not "go out of line"! You can then edit or compare all CheckPoints of the contours in a reference system at any time.
Electric guitar design - basic principles
Designer Kerry Kruger
Designer Kerry Kruger tried to establish a system of analysis and terminology that would allow anyone to understand and describe any non-acoustic guitar design and to criticize or improve it visually. Many of the underlying principles there are fairly obvious, but he would imagine describing them clearly to a relative beginner. Of course he apologizes to the advanced.
http://guitardesignreviews.com/2011/06/fundamentals-of-electric-guitar-design-part-1/#comment-782
Designer Diego Fabian

Spanish designer Diego Fabian sees the offset variants from his own point of view and shows how a design can be made from the start. I quote:
"This thread is for everyone who wants and cannot, for those who could and for those who want to start with this design / construction
Be careful, I am not an authority on this. I just want to share with you the information, arguments, and ideas (my own and those of others) that I have gathered over these years of research
http://diegofabianguitars.blogspot.com
Basics of electric guitar design:
As a basic rule (as absurd as it may seem) one has to think that the guitar is played by a person and has to be related to this person and its proportions.
Most body guitars fit within a 18 "by 24" rectangle, and solid-body guitars are usually within 14 "by 20". The necks are usually between 16" and 22" long, depending on their size (scale length);
Other procedures for guitar design
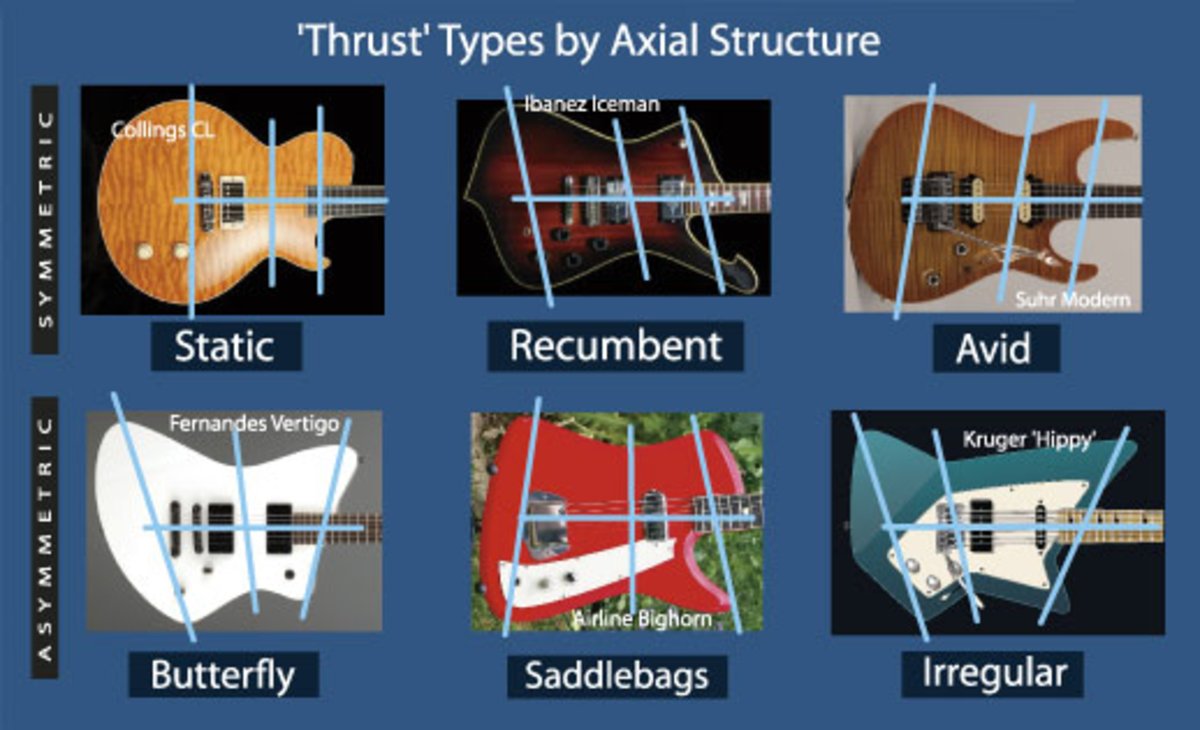
Both designers (Kruger and Fabian) describe the offset principles very similarly and it is obvious that they are very familiar with each other. In either case, both discussions provide a lot of useful information about the correct way to go about designing novel guitar shapes.
"The guitar or bass of your dreams, from the first draft to the full plan", is the subtitle of a book by Leo Lospennato (Electric Guitar & Bass DESIGN). There is a huge amount of information here on all aspects of electric guitar design for both beginners and experienced designers.
And what makes E-Guitar Navigator different?
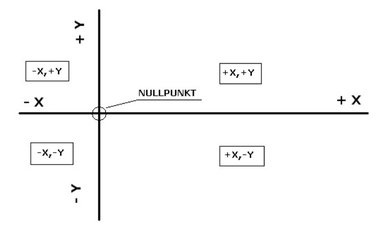
The main goal of the E Navigator is to measure shapes from the whole to the individual details in the Cartesian system. The question is not "what does it look like?" but "how many millimeters, angular degrees, which X or Y position etc.
Offset - where and how much
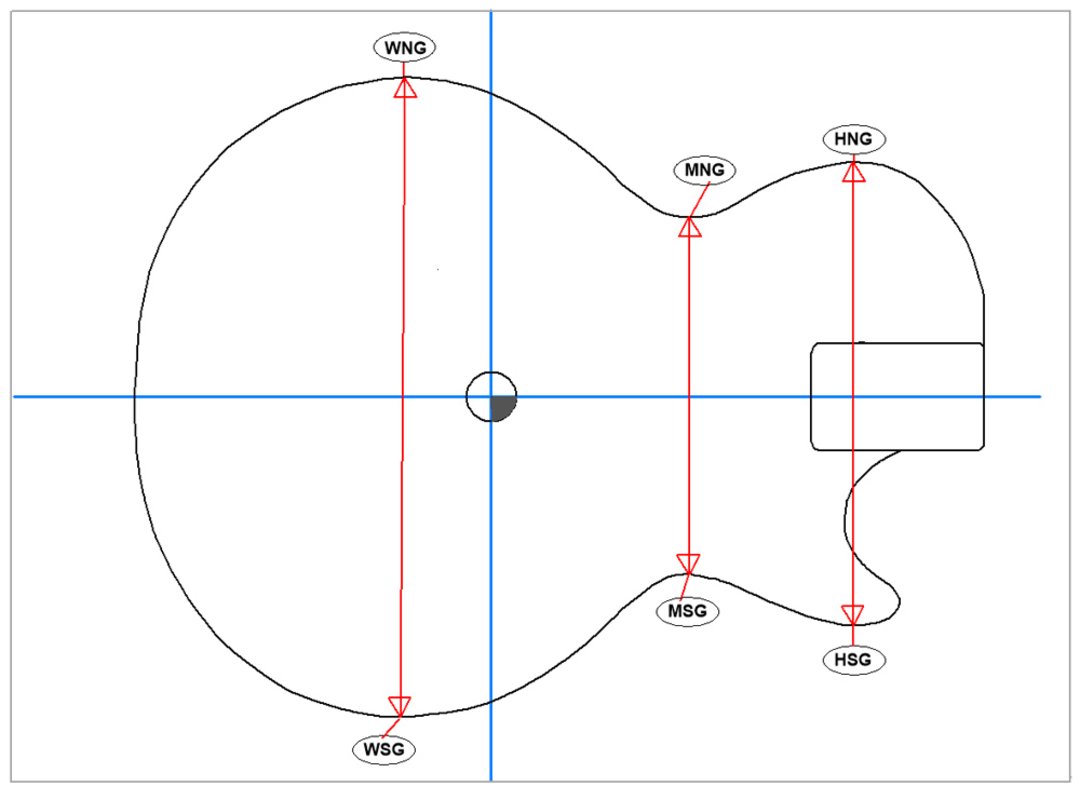
In order to describe the differences quantitatively, we connect the points WNG with WSG, as well as MNG with MSG and HNG with HSG.
These three lines form an angle with the longitudinal axis with a value that is either a right angle or higher or lower than 90 °.
Definition of offset rate

Both designers (Kruger and Fabian) basically deal with the influence of the asymmetry to the longitudinal axis of the guitar on the contours of the body.
Since they analyze relationships based on visual impression, i.e. qualitatively, I was interested in how these relationships can be expressed quantitatively, in numbers. By comparing the angle values of the vertical axes, this works quite accurately.
If the vertical axes are parallel to each other, the offset can only be defined by one value.
Mixed offset
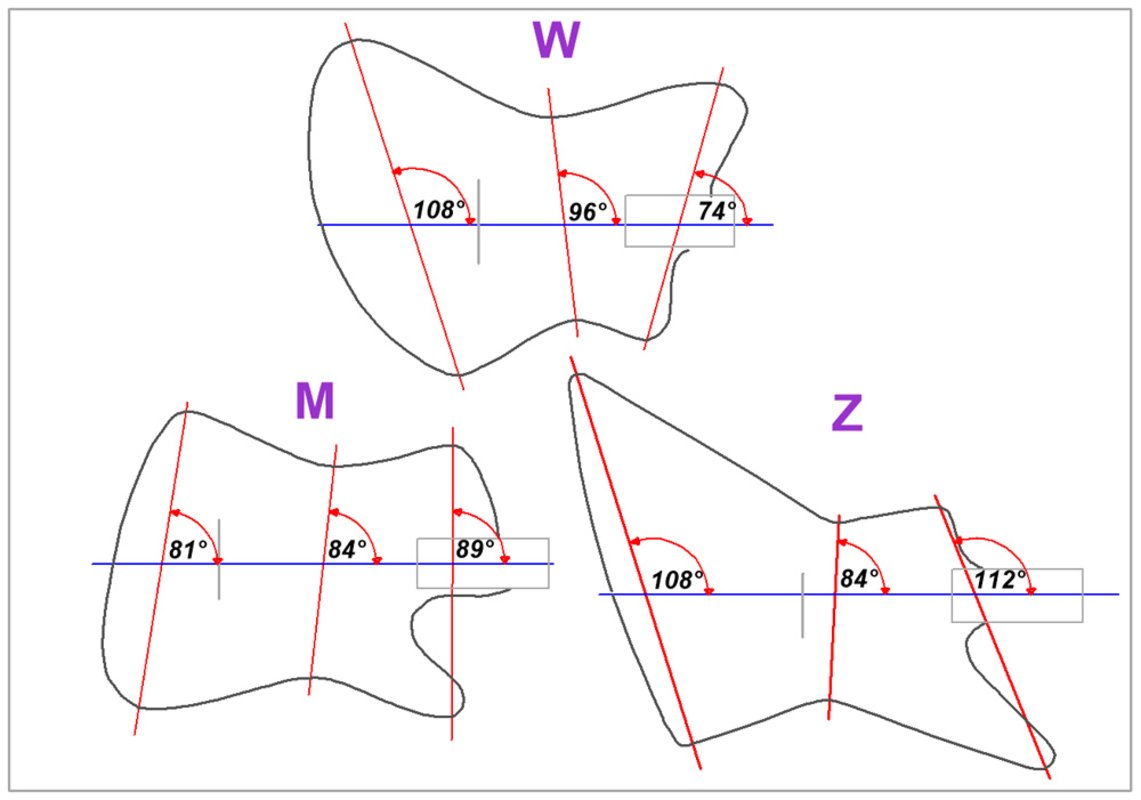
For these variants, the average value of the 90 ° deviation for the offset comparison can be used. For example:
Typ W 278: 3 = 92.7° ............ deviation + 2.7°
Typ M 254: 3 = 84.7° ............. deviation - 5.3°
Typ Z 304: 3 = 101.3° ............ deviation +11.3°
Comments (0)
No comments found!